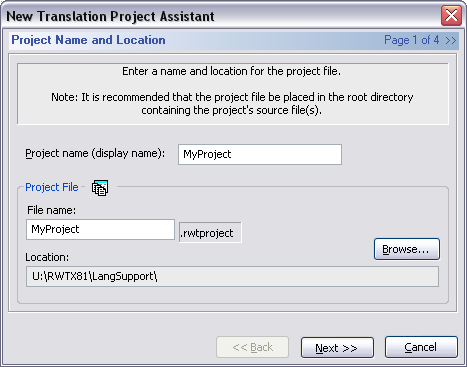
Before a resource file (a file from a software project) can be translated in RC-WinTrans, it must first be added to an translation project. The New Translation Project Assistant guides you through the process of creating a new translation project and adding source files to it so that they can then be translated in RC-WinTrans.
The New Translation Project Assistant is called up via the File | New | Translation Project menu commands. |
The initial page of the New Translation Project Assistant asks you to designate a name for the new project and select a location for it on your computer. It is recommended that the project file be placed in the same directory as the files to be translated (the files added to the project) or in a root directory. This makes it easier to move the project (including the source and data files) since the project file can maintain a relative path to the project's source file(s).
Confirm your selection and continue on to the next step by pressing the Next button. |
Figure 1: The initial page of the New Translation Project Assistant (Project Name and Location page). |
1. Select the project's source language. This is the source language of the (source) files that will be added to the project. 2.
Select one initinal target language. |
Figure 2: Specification of the project's source language and one target language. |
On the Project Options page, select the type of data storage to use to save the project's translation data. NOTE: The database storage is recommended.
See also: "Translation Project." |
Figure 3: Data storage options on the Project Options page. |
Upon pressing the OK button on the final page of the Create New Translation Project Assistant, the Assistant will be closed and the new translation project will be created then opened in RC-WinTrans' Project window. |
|